
Mastering the Art of Contour Makeup: A Comprehensive Guide
How to Contour Makeup
Description
Learn how to contour makeup like a pro with our step-by-step guide. Achieve a sculpted, radiant look that enhances your natural beauty.
Introduction
Contouring makeup has become a beauty trend that’s here to stay. It’s a technique used by makeup artists and enthusiasts alike to create dimension, define facial features, and achieve that coveted red-carpet-ready appearance. But fear not, you don’t need to be a professional to contour effectively. In this article, we will break down the process into easy-to-follow steps, ensuring you can contour like a pro in no time.
How to Contour Makeup: A Step-by-Step Guide
Understanding the Basics of Contour Makeup
Before you begin your journey into the world of contour makeup, it’s essential to grasp the fundamental concepts of how to contour makeup. Learn about the tools, products, and techniques involved in this art.
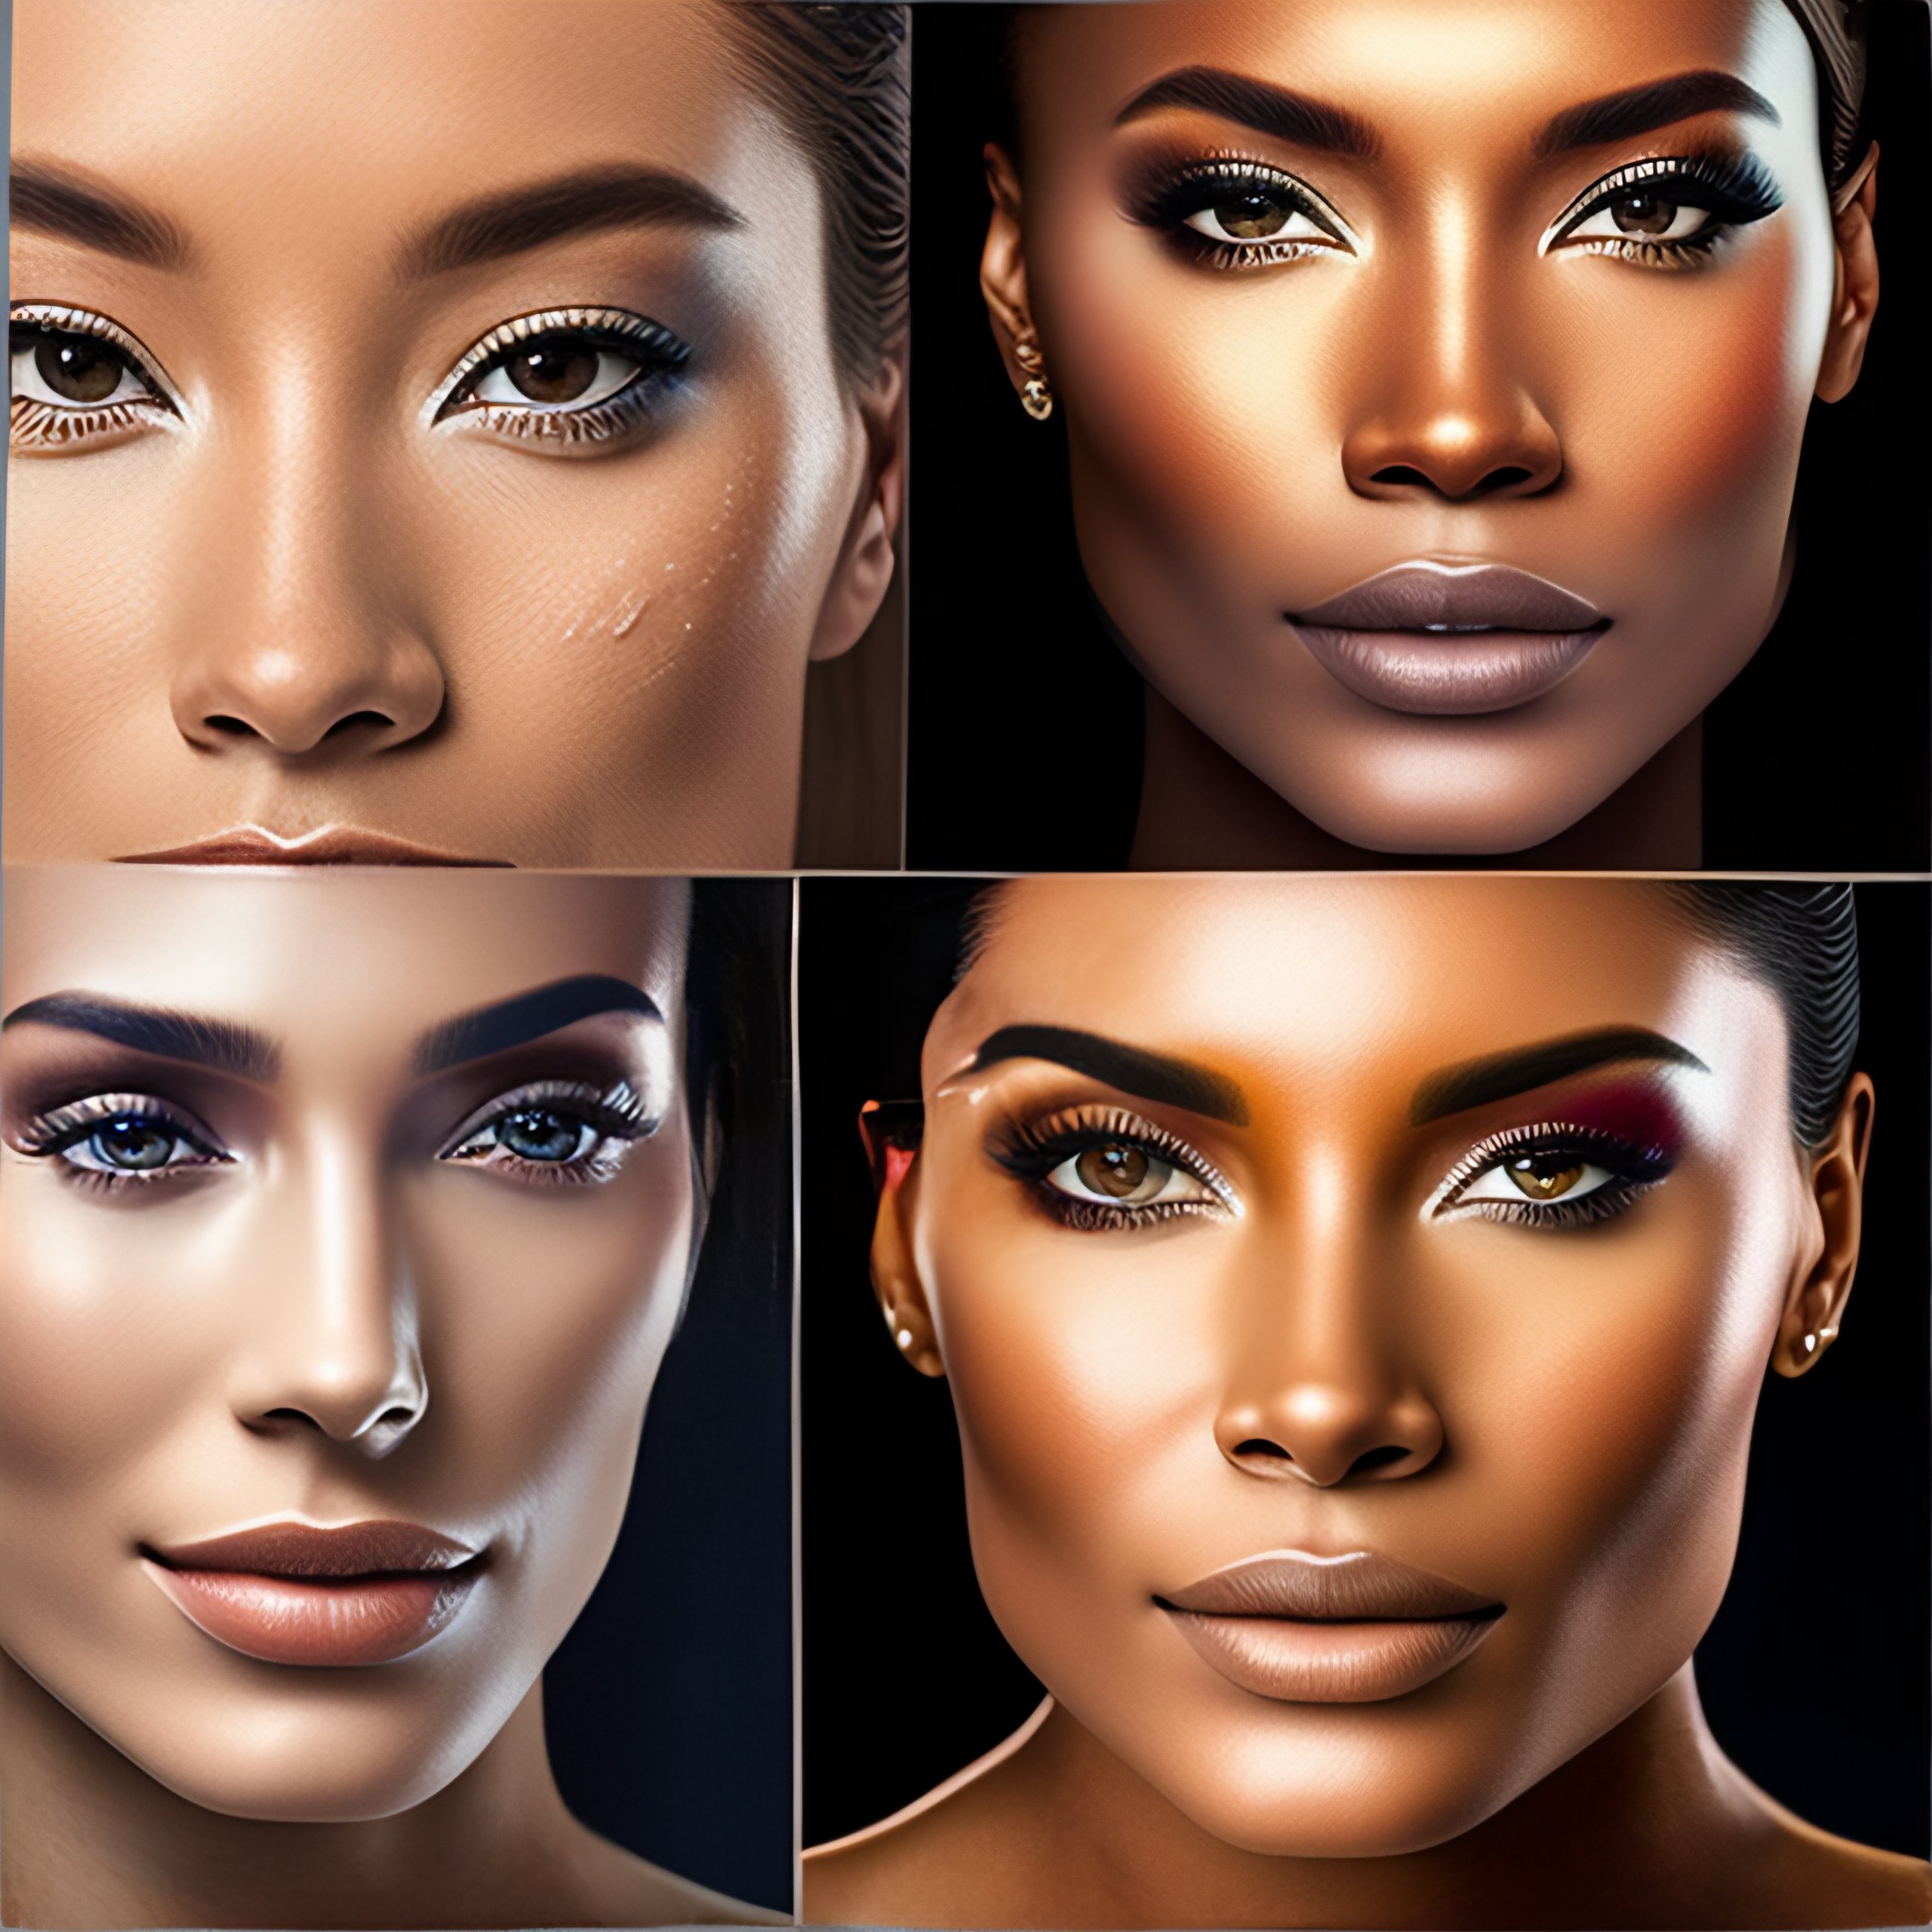
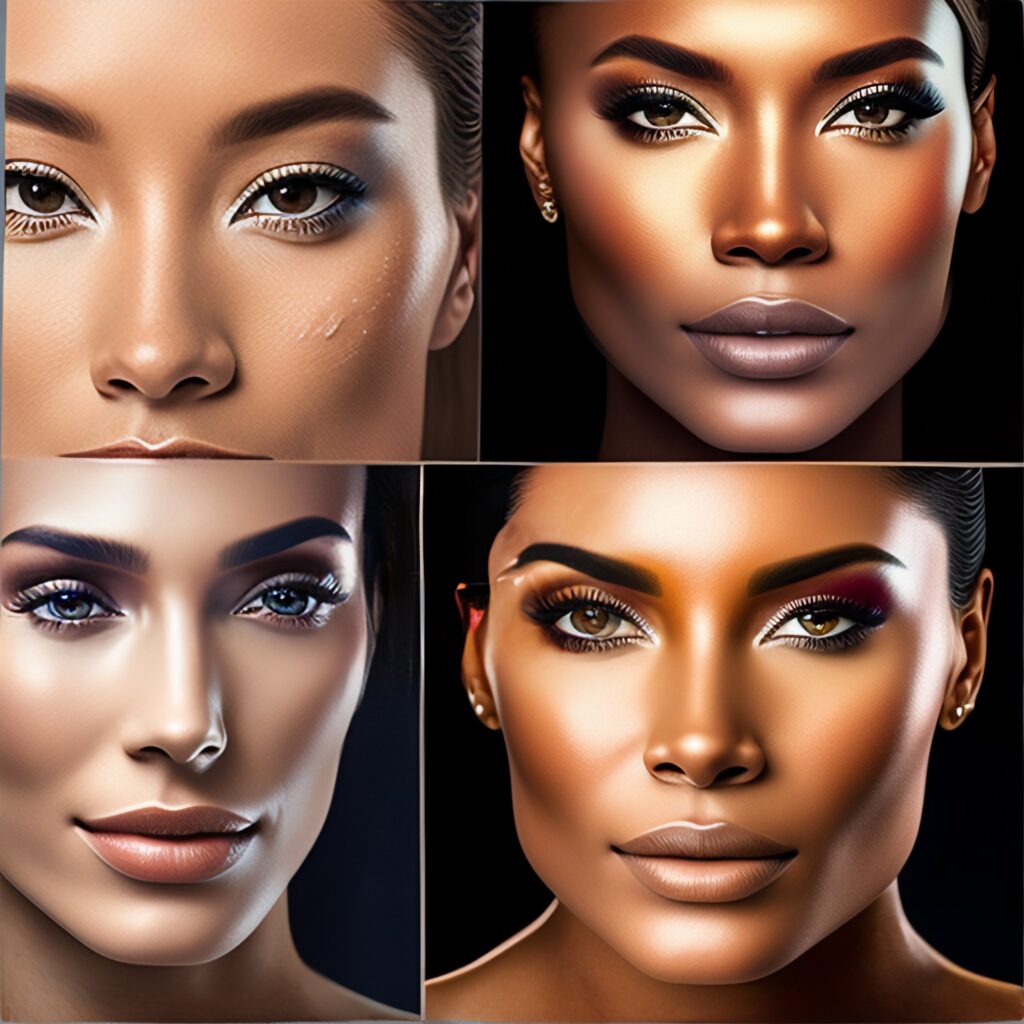
Contour makeup, often referred to as “contouring,” is a transformative technique that involves the strategic use of makeup products to sculpt and define the features of the face. This makeup trend has gained immense popularity in recent years, thanks in part to celebrities and makeup artists who have showcased its dramatic effects on red carpets and social media platforms.
But before diving into the world of contour makeup, it’s crucial to understand its foundational principles and how it works.
1. The Concept of Light and Shadow: At its core, contour makeup relies on the interplay between light and shadow. By strategically applying lighter and darker shades of makeup to specific areas of the face, you can create the illusion of more defined features. This technique is particularly effective for enhancing bone structure and creating a more sculpted appearance.
2. Contour vs. Highlight: Contouring involves using darker shades to create shadows, while highlighting uses lighter shades to bring certain areas forward. Together, these techniques can help reshape the face, making it look slimmer, more chiseled, and more youthful.
3. Essential Products: To begin with, you’ll need a few key products for contour makeup. These typically include a contour powder or cream (a shade or two darker than your natural skin tone), a highlighter (a shade or two lighter), and brushes or sponges designed for precise application. The choice of products can vary depending on your skin type and personal preferences.
4. Face Mapping: One of the fundamental aspects of contouring is understanding where to apply these products. Face mapping is the process of identifying the areas of your face that can benefit from contour and highlight. Common areas for contouring include the hollows of the cheeks, along the jawline, and on the sides of the nose. Highlighting is typically done on the tops of the cheekbones, down the center of the nose, and on the brow bone.
5. Blending Techniques: Achieving a seamless and natural look is a cornerstone of successful contour makeup. Blending is the art of smoothing out harsh lines and ensuring that the makeup seamlessly melds with your skin. Whether you’re using brushes, sponges, or your fingertips, mastering blending techniques is essential for a flawless finish.
6. Skin Tone Considerations: Contour makeup is not one-size-fits-all. The shades you choose should complement your skin tone. Those with fair skin may opt for cooler-toned contour shades, while those with deeper skin tones may prefer warmer shades. It’s essential to experiment and find the right products that suit your complexion.
7. Practice Makes Perfect: Like any skill, mastering contour makeup takes practice. Don’t be discouraged if your initial attempts don’t yield perfect results. With time and experimentation, you’ll refine your technique and discover what works best for your unique face shape and features.
In summary, understanding the basics of contour makeup is the first step towards achieving a stunning, sculpted look. It’s a technique that allows you to embrace your creativity, enhance your natural beauty, and express yourself through makeup. As you gain proficiency in contouring, you’ll find that it’s a powerful tool for boosting your confidence and achieving the desired aesthetic effects.
Essential Tools and Products for Contouring
Discover the brushes, palettes, and shades that are essential for effective contouring. We’ll guide you through selecting the right products for your skin tone so that you can confidently apply contour makeup.
Contouring is an artful makeup technique that involves reshaping and defining facial features through the skillful use of makeup products. To embark on your journey towards achieving a flawless contoured look, it’s essential to have the right tools and products at your disposal. These are the key essentials you’ll need:
1. Contouring Palette or Cream:
- Contour makeup typically involves the use of a matte powder or cream that is a shade or two darker than your natural skin tone. This product is used to create shadows on the face, defining features such as cheekbones, jawline, and the nose.
- Cream contour products offer a more seamless blend and are ideal for those with dry or combination skin, while powder contours work well for oily skin types.
2. Highlighter:
- Highlighters come in various forms, including powder, cream, and liquid. They are used to add a touch of luminosity to the high points of your face, such as the tops of your cheekbones, the bridge of your nose, and the brow bone.
- The shade of your highlighter should be a few shades lighter than your skin tone for a natural, radiant effect.
3. Contour and Highlight Brushes:
- Specialized brushes designed for contouring and highlighting are crucial for precise application. A contour brush typically has a slanted or tapered shape to fit into the hollows of the cheeks and along the jawline, while a highlighter brush is smaller and designed to apply product to smaller areas like the nose and brow bone.
- Beauty sponges or makeup brushes with a flat edge can also be used for blending and creating seamless transitions between contour and highlight.
4. Makeup Blending Sponges:
- Makeup sponges, often referred to as beauty blenders, are versatile tools for blending contour and highlight products seamlessly into the skin. They can be dampened slightly before use to ensure a smoother application.
- The rounded sides of a makeup sponge are great for blending large areas, while the pointed tip is excellent for more precise work, such as nose contouring.
5. Setting Powder:
- To ensure that your carefully crafted contour and highlight stay in place all day, setting powder is essential. Translucent setting powder is the most versatile option, as it doesn’t alter the color of your makeup.
- Use a small, fluffy brush to apply setting powder over your makeup, focusing on areas prone to shine, like the T-zone.
6. Makeup Primer:
- While not directly related to contouring, a good makeup primer is essential for creating a smooth canvas for your contour and highlight products. It helps makeup adhere better and last longer.
- Choose a primer that suits your skin type, whether it’s hydrating for dry skin or mattifying for oily skin.
7. Makeup Remover or Cleansing Wipes:
- In case you need to make corrections or remove excess product during the contouring process, having makeup remover or cleansing wipes on hand is beneficial. These can help you achieve a precise and flawless finish.
8. Mirror with Good Lighting:
- Proper lighting is crucial for successful contouring. A well-lit area and a good-quality mirror will allow you to see the details clearly and ensure even application.
As you gather these essential tools and products for contouring, remember that practice is key to achieving the perfect contoured look. Experiment with different shades and techniques to discover what works best for your unique face shape and skin type. With dedication and the right tools, you’ll be well on your way to mastering the art of contour makeup.
How to Contour Makeup
Face Preparation for Flawless Contour
Prepping your face is key to achieving a flawless contour. Find out how to start with a clean, moisturized canvas and the importance of using a makeup primer when you want to know how to do contour makeup.
Before delving into the world of contour makeup, it’s crucial to understand that achieving a flawless contoured look begins with proper face preparation. This essential step not only ensures a smooth and even application but also contributes to the longevity of your makeup. Here’s a comprehensive guide on how to prepare your face for flawless contour:
1. Cleansing:
- Start with a clean canvas by thoroughly cleansing your face. Use a gentle cleanser that suits your skin type to remove dirt, excess oil, and any residual makeup. Cleansing helps create a smooth surface for makeup application.
2. Exfoliation (Optional):
- Exfoliation, when done sparingly, can help remove dead skin cells and create a smoother texture for makeup. However, it’s essential to choose a gentle exfoliant and not overdo it, as excessive exfoliation can irritate the skin.
3. Moisturization:
- Apply a suitable moisturizer to hydrate and nourish your skin. Proper hydration is essential, as it prevents makeup from clinging to dry patches and ensures a more even application.
- Allow the moisturizer to absorb fully before proceeding with makeup application.
4. Primer:
- A makeup primer is a game-changer when it comes to face preparation. It not only helps your makeup adhere better but also creates a barrier between your skin and makeup, preventing clogged pores.
- Choose a primer that suits your skin type, whether it’s hydrating for dry skin or mattifying for oily skin. Apply a thin layer evenly over your face.
5. Sunscreen (Daytime Only):
- If you’re applying contour makeup during the daytime, don’t forget to incorporate sunscreen into your routine. Sun protection is vital for preventing premature aging and protecting your skin from harmful UV rays.
- Opt for a broad-spectrum sunscreen with SPF 30 or higher and apply it after moisturizer and before primer.
6. Allow Products to Set:
- After completing these steps, it’s crucial to allow the products to set on your skin. Give your moisturizer, primer, and sunscreen (if used) a few minutes to absorb fully before applying makeup. This ensures that your contour products adhere properly.
7. Hair Management:
- If you have long hair or bangs that could interfere with your makeup application, consider securing them away from your face using hairpins or a headband. This will allow you to have a clear and uninterrupted view of your facial contours.
8. Clean Hands and Brushes:
- Ensure that your hands and makeup brushes are clean before you begin applying makeup. Dirty hands or brushes can transfer oil and bacteria to your face, affecting the final result.
By diligently following these steps for face preparation, you set the stage for flawless contour makeup application. The clean, hydrated, and primed canvas allows your contour and highlight products to blend seamlessly, creating a sculpted and defined look that enhances your natural beauty. Remember that proper preparation not only enhances the aesthetics of your makeup but also contributes to the health and well-being of your skin.
Highlighting Techniques for a Radiant Glow
Learn how to apply a lighter shade to highlight specific areas of your face, such as your cheekbones, nose bridge, and under-eye area, a vital part of how to apply contour makeup.
Highlighting is a crucial step in contour makeup that can elevate your overall look by adding a radiant and youthful glow to specific areas of your face. When done correctly, highlighting enhances your bone structure and creates a luminous finish. Here’s a comprehensive guide on highlighting techniques for achieving that coveted radiant glow:
1. Choose the Right Highlighter:
- The first step in highlighting is selecting the right highlighter product. Highlighters come in various forms, including powder, cream, and liquid. Choose one that suits your skin type and personal preference.
- Opt for a shade that complements your skin tone. Champagne and pearl shades work well for fair skin, while golden and bronze tones are flattering on deeper complexions.
2. Identify High Points of the Face:
- Highlighter is applied to the high points of your face where light naturally hits. Common areas include:
- Tops of the cheekbones: Apply highlighter along the upper edge of your cheekbones to create a lifted appearance.
- Bridge of the nose: A subtle stripe of highlighter down the center of your nose can make it appear slimmer.
- Cupid’s bow: Highlighting this area above your upper lip adds a touch of allure.
- Brow bone: A small amount on the brow bone accentuates your eyes.
- Inner corners of the eyes: Applying highlighter here brightens your eyes and makes them appear larger.
3. Application Techniques:
- Finger Application: For a natural and subtle glow, lightly tap your ring finger into the highlighter and gently press it onto the chosen areas.
- Brush Application: A fan brush or a small, fluffy brush is excellent for a precise application. Dip the brush into the highlighter and dust it over the high points of your face.
- Blending: After applying the highlighter, use a clean makeup sponge or brush to blend the product into your skin. This step is crucial for achieving a seamless and natural look.
4. Less is More:
- It’s essential to use highlighter sparingly. Start with a small amount, and gradually build up if you desire a more intense glow. Overdoing it can lead to an overly shiny or greasy appearance.
5. Highlighting Specific Areas:
- If you want to take your highlighting to the next level, consider these additional areas:
- Collarbone and shoulders: Applying highlighter to these areas can enhance your overall radiance, especially if you’re wearing an off-shoulder outfit.
- Center of the forehead: A touch of highlighter in the center of your forehead can create the illusion of a more prominent brow bone.
- Chin: Highlighting the chin can add dimension to your face and create a harmonious balance.
6. Highlighter Texture:
- The choice of highlighter texture depends on your skin type and the look you want to achieve. Cream and liquid highlighters offer a dewy finish and are excellent for dry skin. Powder highlighters provide a matte glow and work well for oily skin.
7. Setting Spray (Optional):
- To lock in your highlighter and ensure it lasts all day, you can finish your makeup routine with a setting spray. This step can also give your skin a natural, dewy finish.
Highlighting is a makeup technique that allows you to embrace your inner glow and add dimension to your face. By mastering these highlighting techniques, you can achieve a radiant and youthful look that enhances your natural beauty and leaves you with a luminous finish.
Contouring for Definition and Depth
Master the art of contouring by applying a darker shade strategically to create shadows and define features like your jawline, cheekbones, and nose. This is the essence of how to contour with makeup.
Contouring is a makeup technique that can work wonders in enhancing your facial features, creating the illusion of definition, and adding depth to your overall look. When done correctly, it can transform your face by sculpting and emphasizing your bone structure. Here’s an in-depth guide on how to contour effectively for definition and depth:
1. Choose the Right Contour Shade:
- The key to successful contouring is selecting a contour shade that is a few shades darker than your natural skin tone. The contour shade should have a matte finish, as shimmer or glitter can diminish the illusion of shadows.
2. Identify Areas to Contour:
- Understanding where to apply contour is essential. The areas commonly contoured include:
- Cheekbones: Apply contour just below your cheekbones to create the appearance of higher, more defined cheekbones.
- Jawline: Contour along your jawline to define it and create a more sculpted appearance.
- Nose: Nose contouring can make your nose appear slimmer. Apply contour along the sides of your nose, blending well.
- Forehead: If you have a larger forehead and want to make it appear smaller, apply contour along the hairline.
- Chin: Contouring the chin can add definition and balance to your face.
3. Application Techniques:
- Brush Application: A contour brush with a slanted or tapered shape is ideal for precise application. Dip the brush into the contour shade, tap off excess, and apply it along the desired areas.
- Blending: After applying the contour, use a clean makeup brush, sponge, or your fingertips to blend the product thoroughly. Blending is crucial for achieving a seamless and natural look.
4. Blend, Blend, Blend:
- The key to successful contouring is impeccable blending. Harsh lines or visible contour marks can be distracting and unnatural. Take your time to blend the contour shade seamlessly into your skin for a subtle and defined effect.
5. Gradual Building:
- It’s always better to start with a small amount of contour product and gradually build it up if needed. This approach allows you to maintain control over the intensity of the contour and ensures a more natural appearance.
6. Lighting Considerations:
- Keep in mind that contouring works by creating shadows. Ensure you have adequate lighting while applying contour to avoid overdoing it. Natural daylight or well-lit areas are ideal for accurate application.
7. Skin Tone Matching:
- The contour shade should complement your skin tone. Those with fair skin may opt for cooler-toned contour shades, while those with deeper skin tones may prefer warmer shades. Experiment to find the right shade for your complexion.
8. Contour Placement for Face Shapes:
- Tailor your contour placement to your specific face shape. Different face shapes require slightly adjusted contouring techniques to achieve the most flattering results. Common face shapes include oval, round, square, and heart-shaped.
Contouring for definition and depth is a makeup technique that allows you to enhance your natural features, emphasize bone structure, and create a more sculpted look. By choosing the right contour shade, applying it strategically, and blending effectively, you can achieve a defined and sophisticated appearance that elevates your makeup game. Practice and experimentation will help you master the art of contouring for your unique face shape and style.
Blending Like a Pro for Seamless Beauty
Blending is the secret to achieving a seamless and natural-looking contour. Discover the techniques for blending highlight and contour shades flawlessly, a crucial aspect of how to blend contour makeup.
Blending is the secret sauce that transforms makeup from ordinary to extraordinary. It’s a crucial step in contour makeup that ensures a seamless and natural finish, enhancing your features while avoiding harsh lines and uneven textures. Whether you’re new to makeup or a seasoned pro, mastering the art of blending is essential for achieving a flawless look. Here’s a comprehensive guide on how to blend like a pro for seamless beauty:
1. Choose the Right Tools:
- The right tools make all the difference in blending. Invest in high-quality makeup brushes, sponges, or beauty blenders. Brushes with soft, dense bristles are excellent for blending powder products, while sponges are great for blending creams and liquids.
2. Blend in Natural Light:
- Natural light is your best friend when it comes to blending. Apply makeup near a window or in a well-lit room to ensure you can see the colors and textures accurately. This prevents over-blending or uneven application.
3. Begin with a Light Hand:
- When applying contour or highlight, start with a light hand. Use a minimal amount of product, and gradually build up the intensity as needed. This approach allows for better control and avoids overdoing it.
4. Feather-Like Strokes:
- Use light, feather-like strokes when blending. Gentle, sweeping motions with your brush or sponge help distribute the product evenly without disturbing the underlying layers.
5. Circular Motions:
- For larger areas, such as the cheeks or forehead, employ circular blending motions. This technique helps the product melt seamlessly into your skin, creating a natural and diffused effect.
6. Tap and Pat:
- When blending in delicate or small areas, like the under-eye region or the sides of the nose, use a tapping or patting motion. This minimizes tugging on the skin and ensures a smooth, even finish.
7. Blend Outward:
- Always blend your contour and highlight products in an outward direction. For example, blend contour from the center of your face toward your hairline. This technique lifts the face and creates a natural transition.
8. Keep Clean Tools:
- Ensure your blending tools are clean. Dirty brushes or sponges can transfer old makeup or oils onto your fresh application, affecting the blending process.
9. Use Translucent Powder:
- To further enhance blending and set your makeup, lightly dust translucent setting powder over your contoured areas. This helps eliminate any excess shine and locks the makeup in place.
10. Build Gradually:
- Blending is a gradual process. Take your time to blend and assess your progress as you go along. This way, you can achieve the desired level of intensity without rushing.
11. Blend Contour and Highlight Together:
- To create a harmonious look, blend your contour and highlight shades together where they meet. This ensures a seamless transition and avoids any harsh lines between the two.
12. Check in Different Lighting:
- After blending, check your makeup in various lighting conditions to ensure it looks natural and even from all angles.
Mastering the art of blending like a pro is a skill that can significantly enhance your makeup game. It’s the key to achieving a flawless, airbrushed finish that accentuates your features while maintaining a natural appearance. Practice, patience, and the right techniques will help you become a blending expert, ensuring your makeup always looks seamless and beautiful.
Nose Contouring for a Sleek Look
Achieve a slimmer and more defined nose with precise nose contouring techniques, an integral part of how to contour makeup step by step.
Nose contouring is a makeup technique that can create the illusion of a slimmer, more defined nose. It’s a valuable tool in the world of contour makeup, allowing you to achieve a sleek and refined appearance without resorting to surgery. Whether you have a broad nose or simply want to enhance your nose’s natural shape, mastering nose contouring can be a game-changer. Here’s a comprehensive guide on how to contour your nose for a sleek look:
How to Contour Makeup
1. Preparation:
- Start with a well-prepped face. Ensure your foundation and concealer are applied evenly to create a smooth canvas for contouring.
2. Choose the Right Contour Shade:
- Select a contour shade that is a few shades darker than your skin tone. Opt for a matte contour product, as shimmer or glitter can look unnatural on the nose.
3. Identify Areas to Contour:
- Nose contouring focuses on creating shadows along the sides of the nose to make it appear slimmer. Common areas to contour include:
- Sides of the Bridge: Apply contour along the sides of the nose bridge, starting from the area between your eyebrows and extending downward. This creates the illusion of a narrower bridge.
- Tip of the Nose: To refine the nose tip, apply a small amount of contour shade to the very tip. This can make the nose appear more petite and refined.
4. Application Techniques:
- Use a thin makeup brush with a tapered or pointed tip for precise application. Dip the brush into the contour shade and tap off any excess product.
- Apply the contour shade along the sides of the nose bridge, blending it outward toward your cheeks.
- To contour the nose tip, gently sweep the brush along the tip, focusing on the area where you want to create definition.
5. Blending:
- After applying the contour, use a clean makeup sponge, brush, or your fingertip to blend the product. Blend in an upward and outward motion to create a natural gradient effect.
- Ensure that there are no visible lines or harsh edges; the contour should seamlessly merge with your skin.
6. Highlight the Nose Bridge:
- To further enhance the illusion of a slimmer nose, apply a small amount of highlighter along the center of your nose bridge. This draws attention to the bridge and adds dimension.
- Blend the highlighter gently to avoid stark contrasts.
7. Gradual Building:
- As with all contouring, start with a light hand and gradually build up the contour shade to achieve your desired level of definition. Less is often more when it comes to nose contouring.
8. Check in Different Lighting:
- After completing your nose contour, check your makeup in various lighting conditions to ensure it appears natural and well-blended from all angles.
Nose contouring can be a transformative technique that enhances your overall makeup look. By selecting the right products, using precise application techniques, and blending effectively, you can achieve a sleek and refined nose that complements your facial features. Practice and experimentation will help you become proficient in this art, allowing you to contour your nose with confidence and achieve the desired results.
Setting Your Contour for Long-Lasting Beauty
Lock in your contour with setting powder to ensure it lasts all day and looks impeccable. Learn how to use contour makeup effectively.
After meticulously applying your contour makeup to enhance your facial features, the last thing you want is for it to fade away or smudge throughout the day. Setting your contour is a crucial step to ensure your makeup stays in place and looks impeccable for hours. Here’s a comprehensive guide on how to set your contour for long-lasting beauty:
1. Choose the Right Setting Powder:
- To set your contour, you’ll need a translucent or matte setting powder. Translucent powders are colorless and work well for all skin tones, while matte powders help control shine and maintain the matte finish of your contour.
2. Use a Setting Brush:
- Opt for a setting brush with soft, fluffy bristles. These brushes are designed to distribute powder evenly without disrupting your makeup.
3. Setting Your Contour:
- Once you’ve applied your contour products (cream or powder), wait a moment to let them settle on your skin. Setting too quickly can trap moisture, leading to creasing.
4. Apply Setting Powder:
- Dip your setting brush lightly into the setting powder and tap off any excess. You want a minimal amount of powder on the brush.
- Gently sweep the brush over the areas where you’ve applied contour, ensuring even coverage.
- Focus on the areas you contoured, such as your cheekbones, jawline, nose, and forehead.
5. Press and Roll Technique:
- To set your contour effectively, use the press and roll technique. Instead of sweeping the brush, press it against your skin and roll it gently. This helps the powder adhere to the makeup without disturbing it.
6. Blend as You Go:
- While setting your contour, continue to blend it to ensure there are no visible lines or harsh edges. Use a clean blending brush or sponge if necessary.
7. Avoid Over-Powdering:
- Be cautious not to over-powder, as this can make your makeup appear cakey. Start with a light application, and add more only if needed.
8. Check for Symmetry:
- As you set your contour, take a moment to check for symmetry. Ensure that both sides of your face match in terms of contour placement and intensity.
9. Use Setting Spray (Optional):
- If you want extra insurance for long-lasting makeup, consider using a setting spray. A few spritzes of setting spray can help lock in your contour and ensure it stays put.
10. Blot Excess Product:
– If you accidentally apply too much setting powder, use a clean makeup sponge to blot away any excess. This can help maintain a natural finish.
11. Set Your Entire Face (Optional):
– If you’re concerned about makeup longevity, you can set your entire face with setting powder. However, focus on the contoured areas first, as these are the most critical for maintaining your sculpted look.
Setting your contour with precision and care is essential for ensuring that your makeup stays fresh and beautiful throughout the day or evening. With the right products, tools, and techniques, you can achieve a long-lasting contour that enhances your features and boosts your confidence. Practice these steps to perfect your contour-setting skills and enjoy makeup that looks flawless for hours on end.
Adding Blush and Highlight for a Youthful Glow
Elevate your look by applying blush to your cheeks and a touch of highlighter for that radiant, youthful glow, which is essential for makeup how to contour flawlessly.
Blush and highlighter are the dynamic duo of makeup, capable of adding a youthful and radiant glow to your complexion. When applied correctly, they can enhance your cheekbones, give your skin a healthy flush of color, and create a luminous finish. In this comprehensive guide, we’ll explore how to add blush and highlighter to achieve a youthful and radiant look:
1. Blush Placement:
- Choose a blush shade that complements your skin tone. Rosy pinks, peachy tones, and warm corals are popular choices.
- Smile in the mirror to locate the apples of your cheeks, then apply blush in a circular motion on the apples.
- Blend the blush slightly upward toward your temples for a lifted effect.
2. Blending:
- Blending is key to achieving a natural flush. Use a clean makeup brush or a blending sponge to blend the blush seamlessly into your skin.
- Make sure there are no harsh lines or uneven patches.
3. Choosing Highlighter:
- Select a highlighter shade that matches your skin tone or complements your blush. Champagne, rose gold, and pearl shades are universally flattering.
- The highlighter should have a subtle shimmer, not chunky glitter.
4. Highlighter Placement:
- Apply highlighter to the high points of your face where light naturally hits. These areas include the tops of your cheekbones, the bridge of your nose, the cupid’s bow, and your brow bone.
- You can also apply a small amount to the center of your chin and the inner corners of your eyes to brighten your look.
5. Blending Highlighter:
- Gently blend the highlighter into your skin using a clean makeup brush, a fan brush, or your fingertips.
- Avoid over-applying, as too much highlighter can appear overly shiny.
6. Cream vs. Powder:
- Choose between cream or powder formulations based on your preference. Cream products tend to provide a more dewy finish, while powders offer a subtle shimmer.
7. Gradual Building:
- Start with a light application of both blush and highlighter, and gradually build up the intensity if desired.
- Layering allows you to control the level of radiance.
8. Skin Type Considerations:
- If you have oily skin, you may prefer matte blush and a light hand with highlighter to avoid excessive shine.
- For dry skin, consider cream blush and a more luminous highlighter to add hydration and glow.
9. Longevity:
- To extend the longevity of your blush and highlighter, consider using a makeup setting spray after applying your makeup. This helps lock everything in place.
10. Subtle Daytime vs. Dramatic Evening:
– Adjust the intensity of your blush and highlighter based on the occasion. A subtle application is ideal for daytime, while a more dramatic look can be achieved for evenings or special events.
11. Skin Texture:
– If you have textured skin, be mindful of highlighter placement. Avoid applying it directly on textured areas to prevent emphasizing imperfections.
Adding blush and highlighter to your makeup routine is an excellent way to achieve a youthful and radiant complexion. With the right shades and application techniques, you can enhance your natural beauty, create a healthy flush, and enjoy a luminous glow that boosts your confidence. Experiment with different colors and formulations to find the perfect blush and highlighter combo for your unique style and skin type.
The Final Look: A Stunning Contoured Appearance
See the transformation as we unveil the final contoured appearance—a work of art that enhances your natural beauty. This is the ultimate goal of contouring makeup how to.
After diligently following the steps of contouring makeup, it’s time to revel in the results—the moment when all your efforts culminate in a stunning contoured appearance that enhances your natural beauty. Achieving the final look is a gratifying experience that can boost your confidence and leave you feeling like a makeup pro. Let’s dive into the details of how to achieve a flawless, contoured appearance:
1. Comprehensive Assessment:
- Begin by assessing your makeup in natural light to ensure it looks harmonious and well-blended from all angles.
- Check for symmetry on both sides of your face, ensuring that your contour, highlight, and blush are evenly applied.
2. Makeup Setting Spray:
- For long-lasting results, consider using a makeup setting spray. A few spritzes can help lock in your makeup and maintain its fresh appearance throughout the day or evening.
3. Confidence Boost:
- Embrace the transformation and let your confidence shine through. Contouring isn’t just about changing your appearance; it’s about enhancing your unique features and feeling your best.
4. Natural Appearance:
- The goal of contour makeup is to achieve a natural appearance. Your contoured features should enhance your natural beauty rather than overpower it.
5. Subtle vs. Dramatic:
- Depending on the occasion, you can choose between a subtle or dramatic contour. Daytime looks often call for a softer, more natural contour, while evening events may allow for a bolder and more defined appearance.
6. Self-Expression:
- Makeup is a form of self-expression. Don’t be afraid to experiment with different contouring styles and shades to find what suits your personality and style best.
7. Confidence and Poise:
- A well-executed contour can boost your self-esteem and give you an extra dose of poise and confidence. Hold your head high and flaunt your contoured beauty.
8. Removal and Skin Care:
- At the end of the day or night, ensure you remove your makeup thoroughly. Use a gentle makeup remover or cleanser to clean your face and follow up with your regular skincare routine.
9. Practice Makes Perfect:
- Like any skill, contour makeup improves with practice. Don’t be discouraged if it takes time to perfect your technique. The more you practice, the more confident you’ll become in your contouring abilities.
10. Embrace Your Features:
– Remember that makeup should enhance your features, not mask them. Embrace what makes you unique, and use contouring as a tool to highlight your best attributes.
11. Confidence and Comfort:
– Ultimately, makeup should make you feel confident and comfortable in your own skin. Don’t feel pressured to conform to specific beauty standards; contour in a way that makes you feel empowered and beautiful.
Achieving the final look in contour makeup is a rewarding experience. It’s the culmination of careful planning, precise application, and creative expression. Whether you’re heading to a special event or simply want to elevate your everyday look, mastering the art of contouring allows you to enhance your natural beauty and radiate confidence. So, embrace your contoured appearance with pride and step out into the world feeling stunning and self-assured.
Advanced Techniques for Contour Makeup
Troubleshooting Common Issues in Contouring
Encounter and address common contouring challenges, such as choosing the wrong shade or blending difficulties, which are typical concerns when you’re learning how to contour your makeup.
Contouring can be a transformative makeup technique, but like any art, it comes with its share of challenges. Whether you’re a beginner or a seasoned makeup enthusiast, it’s essential to be prepared to troubleshoot common issues that may arise during the contouring process. Here are some solutions to help you address and overcome these challenges:
1. Uneven Blend:
- Issue: The contour appears patchy or uneven.
- Solution: Ensure you have a clean blending brush or sponge, and blend in gentle, circular motions. Pay attention to areas where the contour and foundation meet to create a seamless blend.
2. Harsh Lines:
- Issue: The contour lines appear too harsh and unnatural.
- Solution: To soften lines, blend more thoroughly. Use a clean brush or sponge to blend and diffuse the product. Alternatively, you can use a translucent setting powder to help blur any harsh lines.
3. Mismatched Shades:
- Issue: The contour shade doesn’t match your skin tone, appearing too dark or too light.
- Solution: Choose a contour shade that is only a few shades darker than your skin tone. Avoid going too extreme with shades. Experiment to find the right shade that suits your complexion best.
4. Overapplication:
- Issue: You’ve applied too much contour product, and it looks heavy or muddy.
- Solution: Start with a light hand when applying contour. It’s easier to add more product if needed than to remove excess. Use a clean brush to blend and diffuse the product.
5. Blending with Foundation:
- Issue: The contour blends with your foundation, losing its definition.
- Solution: Apply contour before foundation. This allows you to layer foundation over the contour, maintaining its definition. Alternatively, use a cream contour product on top of foundation and set it with powder.
6. Wrong Contour Placement:
- Issue: You’ve placed the contour in the wrong areas, making your face look disproportionate.
- Solution: Study your face shape and learn the appropriate areas to contour. Common areas include the hollows of your cheeks, jawline, sides of the nose, and hairline. Adjust your technique based on your face shape.
7. Overwhelmed with Products:
- Issue: You’re using too many contour products, making the makeup look heavy.
- Solution: Simplify your contour routine by using one or two products at most. Choose a contour shade and a highlighter that work well together. Less can often yield better results.
8. Choosing the Wrong Highlighter:
- Issue: The highlighter doesn’t complement your skin tone or has too much shimmer.
- Solution: Opt for a highlighter shade that complements your skin tone. If your skin is fair, go for pearl or champagne tones; for medium skin, choose rose gold or peachy shades; for deep skin, consider bronze or copper hues. Make sure the shimmer in your highlighter is fine and not chunky.
9. Not Blending Nose Contour:
- Issue: Nose contour appears too prominent and unnatural.
- Solution: Blend the nose contour carefully and thoroughly to create a subtle gradient. Use a clean brush or sponge to soften the lines and create a more natural appearance.
10. Foundation Mistakes:
– Issue: Foundation doesn’t apply smoothly over contour or highlight areas.
– Solution: Apply foundation with a gentle patting motion over contoured areas to avoid disrupting the contour. Use a foundation brush or sponge for precise application.
Troubleshooting common contouring issues is an integral part of mastering this makeup technique. With patience, practice, and the right solutions, you can overcome these challenges and achieve a beautifully contoured look that enhances your natural beauty. Don’t be discouraged by initial setbacks; instead, use them as opportunities to learn and refine your contouring skills.
Daytime vs. Evening Contour: Adapting to Different Lighting
Learn how to adapt your contour makeup for daytime elegance and evening glamour, achieving different effects for each. This is particularly important when you’re wondering how to contour for different occasions.
Contouring makeup is not a one-size-fits-all technique; it requires adaptability to different lighting conditions and occasions. Whether you’re getting ready for a daytime event or a glamorous evening affair, understanding how to adjust your contouring can make a significant difference in your overall look. Here’s a guide on how to adapt your contour makeup to different lighting scenarios:
Daytime Contour
1. Subtle and Natural:
- In natural daylight, makeup tends to appear more prominent. Opt for a subtle and natural-looking contour during the day.
- Use a matte or soft satin finish contour product to create shadows without an overly reflective or shimmery finish.
2. Light-Handed Approach:
- Apply contour with a light hand during the day. Avoid heavy-handed application, which can look dramatic and unnatural in bright daylight.
3. Blending is Key:
- Ensure thorough blending to avoid harsh lines. Daylight can highlight makeup imperfections, so take extra care to blend seamlessly.
4. Focus on Skin-Like Texture:
- Choose products that mimic skin-like texture. Cream contour products often work well in natural light as they can create a smooth, dewy finish.
5. Natural Highlight:
- Use a subtle highlighter that adds a natural radiance to your skin. Avoid excessive shimmer during the day.
6. Go Easy on Nose Contour:
- Be especially cautious with nose contour during the day. A heavy nose contour can appear stark and unnatural in natural light.
Evening Contour
1. Enhanced Definition:
- Evening lighting tends to be dimmer, allowing for more dramatic makeup. You can enhance contour for a more defined appearance.
2. Deeper Shades:
- Consider using slightly deeper contour shades for evening events. These can create more striking shadows under artificial lighting.
3. Contour Placement:
- You can be more precise with contour placement for evening makeup. Define your cheekbones, jawline, and nose more prominently.
4. Intensified Highlight:
- In the evening, you can apply a highlighter with a slightly more reflective finish to capture the subtle play of light.
5. Smokey Eye and Lip:
- Evening makeup often includes smokey eye looks and bold lip colors. Coordinate your contour with these elements for a cohesive appearance.
6. Setting Spray:
- Use a setting spray to ensure your contour makeup stays in place throughout the night. Evening events may involve more dancing and activity, so long-lasting makeup is essential.
7. Bold Nose Contour:
- If you desire a more sculpted nose, you can apply a slightly bolder nose contour for evening events. Just be sure to blend it seamlessly.
8. Photograph-Friendly:
- Evening makeup often involves photography. Keep in mind that contour can look softer in photos, so a slightly more intense contour may be necessary.
Adapting your contour makeup to different lighting conditions is a skill that can elevate your overall appearance. Whether it’s a daytime gathering or an evening soiree, understanding how light interacts with makeup allows you to create a harmonious and flattering look. With practice and a keen eye for detail, you can confidently contour for any occasion and always look your best.
Tailor your contouring techniques to suit your unique face shape, whether it’s oval, round, square, or heart-shaped.
Contouring for Mature Skin: Achieving a Youthful Lift
Discover specialized contouring tips for mature skin to create a youthful, lifted appearance, a valuable skill in how to do contouring makeup for mature skin.
Contouring is a makeup technique that can work wonders for mature skin, helping to create a more youthful and lifted appearance. As we age, our skin may lose some of its natural firmness and elasticity, but with the right contouring approach, you can enhance your features, minimize the appearance of fine lines, and achieve a rejuvenated look. Here’s a comprehensive guide on contouring for mature skin:
1. Skin Preparation:
- Begin with a well-hydrated base. Use a moisturizer suitable for mature skin to ensure a smooth canvas.
- Apply a primer to create a barrier between your skin and makeup, helping to minimize the settling of makeup into fine lines.
2. Lightweight Foundation:
- Choose a lightweight, hydrating foundation or a tinted moisturizer. Avoid heavy, matte foundations that can accentuate wrinkles.
3. Cream-Based Contour:
- Opt for cream-based contour products. Creams have a more hydrating texture that blends seamlessly into mature skin.
- Select a contour shade that is a few shades darker than your natural skin tone.
4. Minimal Powder:
- Use powder sparingly. Excessive powder can settle into fine lines and make the skin appear dry. If needed, set your makeup with a finely milled, translucent powder.
5. Contour Placement:
- Focus on contouring areas that can benefit from a lifted appearance, such as the jawline, cheekbones, and forehead.
- Apply contour along the jawline to define and lift it. Blend well to avoid harsh lines.
- Create depth and dimension by contouring the hollows of the cheeks while blending upwards towards the temples.
- Lightly contour the sides of the nose to add definition.
6. Highlight with Care:
- Use a lightweight, creamy highlighter sparingly on areas like the tops of cheekbones, under the brow bone, and on the cupid’s bow. This adds a subtle luminosity without emphasizing texture.
7. Blending Technique:
- Invest time in blending to ensure a seamless finish. Use a makeup sponge or a damp beauty blender to gently blend the contour and highlight.
8. Soft Eye Makeup:
- For eye makeup, opt for soft, neutral tones that complement your overall look. Avoid heavy eyeshadows and harsh lines.
9. Eyebrow Definition:
- Well-groomed and defined eyebrows can frame the face beautifully. Use an eyebrow pencil or powder to shape and fill in sparse areas.
10. Lip Hydration:
– Keep your lips hydrated with a lip balm. Use lip liner and a creamy lipstick for a plump and youthful pout.
11. Setting Spray:
– Finish with a setting spray to lock in your makeup and maintain a fresh appearance throughout the day.
12. Natural Hair Color:
– If you have gray hair, consider whether your current hair color complements your contour makeup. A consultation with a professional colorist can help you find a flattering shade.
Contouring for mature skin is all about enhancing your natural beauty and embracing the changes that come with age. By using the right products, techniques, and a gentle touch, you can achieve a youthful lift that enhances your confidence and radiates timeless elegance. Remember, makeup is a tool to highlight your unique features and express your inner beauty at any age.
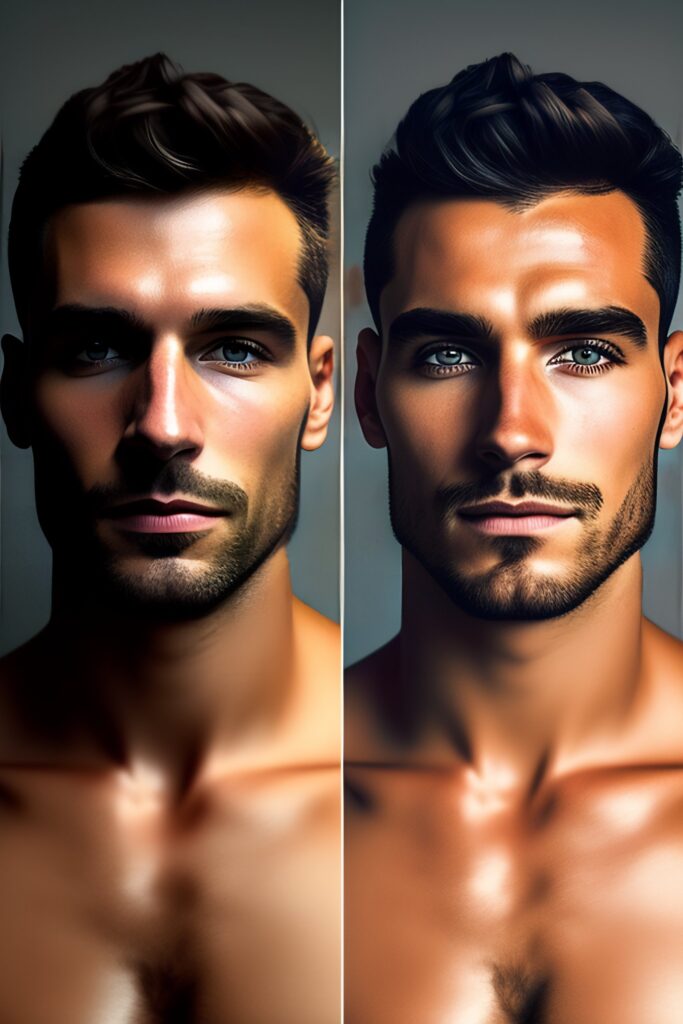
Contouring for Men: Enhancing Masculine Features
Contouring isn’t just for women; men can benefit from this technique to define facial features and enhance their look. This is especially relevant when exploring how to contour for men.
Contouring is not limited to women; it’s a versatile makeup technique that can also enhance the masculine features of men. Whether you want to create a sharper jawline, emphasize your cheekbones, or simply achieve a more defined look, contouring can help you achieve your desired appearance. Here’s a comprehensive guide on contouring for men:
How to Contour Makeup
1. Skin Preparation:
- Begin with clean, moisturized skin. A hydrated base ensures smooth application and blending.
- Use a primer to create a barrier between your skin and makeup, allowing for longer-lasting results.
2. Lightweight Foundation (Optional):
- Depending on your preference, you can apply a lightweight, natural-looking foundation to even out your skin tone. This step is optional and can be skipped for a more natural appearance.
3. Matte Contour Product:
- Opt for a matte contour product, such as a cream or powder that is a few shades darker than your skin tone. Avoid products with shimmer or glitter.
4. Contour Placement:
- Focus on enhancing masculine features, such as the jawline, cheekbones, and nose.
- To define the jawline, apply contour along the jawline and blend downward to create a sharp, chiseled appearance.
- Emphasize the cheekbones by applying contour along the hollows of the cheeks and blending upwards.
- For nose contouring, apply a thin line of contour along the sides of the nose to create a more sculpted look. Be sure to blend well for a natural appearance.
5. Blend Thoroughly:
- Blending is key to achieving a natural look. Use a makeup sponge or a blending brush to ensure a seamless transition between the contour and your natural skin tone.
6. Minimal Highlight:
- Men’s contouring typically requires less highlighting than women’s. If desired, apply a subtle highlighter to the high points of the face, such as the tops of the cheekbones and the bridge of the nose.
7. Groomed Brows:
- Well-groomed eyebrows can frame the face and enhance your overall look. Use an eyebrow brush or gel to tame and shape your brows.
8. Natural Lips:
- For a natural appearance, you can skip lip color or use a clear lip balm to keep your lips hydrated.
9. Setting Spray:
- Finish with a setting spray to ensure your contour makeup stays in place throughout the day.
10. Practice:
– Like any makeup technique, contouring for men improves with practice. Experiment with different levels of contouring to find the balance that suits your style.
11. Removal:
– At the end of the day, use a gentle makeup remover or cleanser to thoroughly remove your makeup and maintain healthy skin.
Contouring for men is about enhancing your natural features and achieving a look that makes you feel confident and empowered. Whether you’re preparing for a special occasion or simply want to accentuate your features, this makeup technique can help you achieve your desired appearance. Remember that makeup is a tool for self-expression, and there are no rules when it comes to defining your unique style.
Body Contouring Techniques: Beyond the Face
Extend your contouring prowess beyond the face. Learn how to create the illusion of sculpted muscles and flawless skin on your body, a unique facet of how to do body contouring.
While contouring is commonly associated with enhancing facial features, it’s a versatile makeup technique that can be extended to the body. Body contouring allows you to define muscles, create the illusion of a more sculpted physique, and enhance your overall look, especially when you’re dressing up for special occasions or photoshoots. Here’s a comprehensive guide on body contouring techniques:
1. Skin Preparation:
- Begin with clean and moisturized skin. Exfoliate if needed to create a smooth canvas.
- Use a body lotion or primer to ensure your contour products adhere well and blend seamlessly.
2. Choose the Right Products:
- Opt for cream or liquid contour products for the body as they are easier to blend and create a natural finish.
- Select a contour shade that is a few shades darker than your natural skin tone.
3. Identify Areas to Contour:
- Determine which areas of your body you want to contour. Common areas include the collarbone, chest, arms, abs, and legs.
- Contouring the collarbone and chest can create the illusion of a more defined chest area.
4. Contouring the Arms:
- To create the appearance of toned arms, apply contour along the sides of the biceps and triceps. Blend upward to create a natural gradient.
5. Abs Contouring:
- To define your abs, apply contour along the natural lines of your abdominal muscles. Blend the product to create shadows and depth.
6. Leg Contouring:
- For shapelier legs, apply contour along the sides of your thighs and calves. Blend the product to create the illusion of more defined leg muscles.
7. Chest Contour:
- To enhance the appearance of your chest, apply contour along the natural curve of the pectoral muscles. Blend well for a seamless finish.
8. Blending Technique:
- Blend contour products thoroughly to avoid any harsh lines or uneven application. Use a makeup sponge or brush designed for the body.
9. Highlight (Optional):
- For added dimension, you can apply a subtle body highlighter to the high points of the contoured areas. This can create a radiant and sculpted look.
10. Setting Spray:
– Finish with a setting spray designed for the body to ensure your contour makeup stays in place, especially if you’ll be wearing it for an extended period.
11. Practice:
– Body contouring may take practice to perfect. Experiment with different techniques and levels of contouring to achieve the desired results.
12. Removal:
– At the end of the day, use a gentle body cleanser to remove your contour makeup and maintain healthy skin.
Body contouring is a fun and creative way to enhance your appearance for special occasions or photoshoots. It allows you to sculpt and define various areas of your body, emphasizing your natural beauty and confidence. Whether you’re stepping into the spotlight or simply enjoying a day out, body contouring can help you look and feel your best from head to toe.
Celebrity Makeup Secrets: Red-Carpet Tips and Tricks
Learn from the makeup tricks and tips used by your favorite celebrities to look red-carpet-ready, valuable insights into how celebrities contour makeup.
When it comes to looking flawless on the red carpet, celebrities have access to some of the best makeup artists and beauty secrets in the industry. Fortunately, you can also benefit from their expert techniques to achieve a glamorous and camera-ready look. Here are some insider tips and tricks inspired by celebrity makeup secrets:
1. Skin Prep is Key:
- Celebrity makeup artists prioritize skincare. Begin with a clean, moisturized face and use a primer to create a smooth canvas for makeup application.
2. Foundation Matching:
- Ensure your foundation matches your skin tone perfectly. Many celebrities opt for airbrush foundation for a flawless finish.
3. Highlight and Contour:
- Contouring and highlighting are essential for creating dimension. Use a matte contour shade to sculpt and a luminous highlighter to add a healthy glow.
4. Eyebrow Perfection:
- Well-defined eyebrows frame the face. Fill in any gaps with a brow pencil or powder and set them in place with a clear brow gel.
5. Eye Makeup Magic:
- Celebrity eye makeup often includes intricate smoky eyes or bold eyeliner. Invest in high-quality eyeshadows, liners, and mascaras for a long-lasting look.
6. Flawless Lips:
- To achieve plump lips like the stars, use lip liner to define and fill in your lips before applying lipstick or gloss. Consider a lip plumper for added volume.
7. Set with Translucent Powder:
- Celebrities swear by translucent powder to set their makeup and keep shine at bay. Apply sparingly to avoid a cakey finish.
8. Faux Lashes:
- For dramatic eyes, use false eyelashes or eyelash extensions. They add instant glamour and make your eyes pop in photos.
9. Blending Mastery:
- Blend your makeup meticulously. Celebrities know that seamless blending is the key to a polished look.
10. Red-Carpet Glow:
– To achieve the coveted red-carpet glow, mix a liquid illuminator with your foundation or apply it strategically to the high points of your face.
11. Long-Lasting Makeup:
– Use a setting spray to lock in your makeup, ensuring it stays fresh throughout the event or photoshoot.
12. Professional Tools:
– Invest in high-quality makeup brushes and tools. They make a significant difference in the application and blending of makeup.
13. Experiment with Colors:
– Don’t be afraid to experiment with bold colors for eyeshadow, lipstick, or eyeliner. Celebrities often use vibrant shades to make a statement.
14. Photo-Ready Finish:
– Test your makeup under different lighting conditions, including natural and artificial light, to ensure it looks flawless in photos.
15. Confidence is Key:
– The most important celebrity secret is confidence. Wear your makeup with confidence, and you’ll radiate star power.
By incorporating these celebrity makeup secrets into your routine, you can achieve a red-carpet-worthy look for any special occasion or photoshoot. Remember that makeup is an art form, and practice makes perfect. With dedication and a few expert tricks up your sleeve, you can feel like a celebrity every time you step out into the spotlight.
Budget-Friendly Contour Products: Quality on a Budget
Discover affordable contouring products that deliver professional-quality results, essential for those looking to know how to contour on a budget.
Achieving a beautifully contoured look doesn’t have to break the bank. There are numerous budget-friendly contour products available that offer quality results without the high price tag. Whether you’re new to makeup or simply want to save on your beauty expenses, here’s a guide to finding affordable contour products that deliver exceptional results:
1. Research and Reviews:
- Start by researching budget-friendly contour products online. Read reviews and watch tutorials to get an idea of which products have worked well for others.
2. Drugstore Brands:
- Drugstore makeup brands often offer a wide range of affordable contour products. Look for well-known brands that have a reputation for quality.
3. Cream or Powder:
- Decide whether you prefer cream or powder contour products. Cream contours provide a natural finish, while powder contours are great for setting makeup.
4. Shade Selection:
- Choose contour shades that are a few shades darker than your natural skin tone. Look for shades that have a neutral undertone to create realistic shadows.
5. Cruelty-Free Options:
- Many budget-friendly brands are cruelty-free, meaning they do not test their products on animals. Check the labels or brand websites for cruelty-free options.
6. Contour Kits:
- Some brands offer contour kits that include multiple shades for contouring, highlighting, and bronzing. These kits can be cost-effective.
7. Swatch In-Store:
- If possible, visit a store to swatch and test contour products on your skin. This can help you find the right shade and texture.
8. Online Discounts:
- Keep an eye out for online discounts, coupons, and promotions. Many websites offer sales on makeup products.
9. Multipurpose Products:
- Look for multipurpose products that can be used for both contouring and highlighting. This can save you money and space in your makeup bag.
10. Makeup Dupes:
– Some budget-friendly brands create makeup dupes or alternatives to high-end products. These can mimic the performance of expensive brands at a fraction of the cost.
11. Set with Translucent Powder:
– To make your contour last longer, set it with a translucent powder. Affordable translucent powders are widely available.
12. Clean Brushes:
– Clean your makeup brushes regularly to ensure smooth and even application of your contour products. Properly cared-for brushes can extend the life of your makeup.
13. User-Friendly Tools:
– Consider using makeup sponges and brushes that are easy to handle. These tools can help you apply contour products with precision.
14. Blend Thoroughly:
– Regardless of the price of your contour products, blending is key. Take the time to blend your contour seamlessly for a professional finish.
15. Practice and Experiment:
– Don’t be discouraged if you don’t get it right the first time. Practice and experiment with different techniques to achieve your desired look.
Budget-friendly contour products can be a fantastic addition to your makeup collection without compromising on quality. With a little research and experimentation, you can discover affordable products that help you achieve beautifully sculpted and defined features, all while keeping your beauty budget in check.
Contouring Dos and Don’ts: Best Practices: How to Contour Makeup
Avoid common contouring mistakes and embrace the best practices for a flawless finish, which are essential in contouring dos and don’ts.
Contouring is a transformative makeup technique that can enhance your facial features and create a more sculpted appearance. However, to achieve the best results, it’s important to follow certain dos and don’ts. Here are some best practices for contouring:
Dos:
1. Start with a Clean Canvas:
- Always begin with clean, moisturized skin. Use a gentle cleanser and apply a lightweight moisturizer before starting your makeup.
2. Choose the Right Shade:
- Select a contour shade that is a few shades darker than your natural skin tone. Avoid shades that are too warm or orange-toned, as they can appear unnatural.
3. Blend, Blend, Blend:
- Blend your contour thoroughly to avoid harsh lines. Use a makeup sponge, brush, or your fingertips to achieve a seamless transition between the contour and your skin.
4. Layer Gradually:
- It’s easier to add more contour if needed than to remove excess product. Start with a small amount and build up gradually for a natural look.
5. Set with Translucent Powder:
- Set your contour with a translucent setting powder to prevent it from smudging or fading throughout the day.
6. Highlight Strategically:
- Use a highlighter sparingly to enhance the high points of your face, such as the tops of your cheekbones, the bridge of your nose, and your cupid’s bow.
7. Blend the Jawline:
- Blend the contour along your jawline and neck to ensure a seamless transition and avoid the appearance of a makeup line.
8. Adapt to Different Lighting:
- Check your makeup in different lighting conditions, including natural and artificial light, to ensure it looks balanced and flattering.
Don’ts:
1. Over-Contouring:
- Avoid applying too much contour, as it can look heavy and unnatural. Less is often more when it comes to contouring.
2. Harsh Lines:
- Steer clear of harsh lines or stripes of contour. Blending is essential to create a soft, natural appearance.
3. Using the Wrong Shade:
- Don’t use a contour shade that is too warm, as it can make you appear sunburned rather than sculpted.
4. Neglecting Your Neck:
- Don’t forget to blend the contour along your jawline and neck to create a cohesive look.
5. Ignoring Skin Type:
- Consider your skin type when selecting contour products. Cream contours work well for dry skin, while powder contours are suitable for oily skin.
6. Skipping Setting Powder:
- Skipping setting powder can cause your contour to smudge or lose its definition throughout the day.
7. Over-Highlighting:
- Avoid excessive highlighting, as it can make your skin appear overly shiny and may not be suitable for all occasions.
8. Rushing the Process:
- Contouring takes time and precision. Don’t rush the process; take your time to achieve a flawless look.
By following these contouring dos and don’ts, you can master this makeup technique and create a beautifully sculpted appearance that enhances your natural features. Practice, patience, and attention to detail are key to achieving professional-looking contour results.
Removing Contour Makeup: A Clean Slate :How to Contour Makeup
Learn how to effectively remove contour makeup and maintain healthy skin, a necessary step in how to remove contour makeup.
After a day or night of beautifully contoured makeup, it’s essential to remove it properly to maintain healthy skin and prevent clogged pores. Removing contour makeup may seem straightforward, but there are some key steps and products to consider for an effective and gentle removal process:
1. Gather Your Supplies:
- Before you start, gather your makeup removal supplies. You’ll need a gentle makeup remover, cleansing oil, micellar water, cotton pads, and a clean towel.
2. Wash Your Hands:
- Always begin by washing your hands to ensure that you’re not transferring any dirt or bacteria to your face during the removal process.
3. Remove Eye Makeup First:
- Start by removing any eye makeup, including mascara and eyeshadow, using a dedicated eye makeup remover or cleansing oil. Apply the remover to a cotton pad and gently wipe away the makeup, moving from the inner corner of your eye outward.
4. Lip Makeup Removal:
- If you’re wearing lip products, use a lip makeup remover or a small amount of cleansing oil on a cotton pad to wipe away lipstick or lip liner.
5. Makeup Remover for Contour:
- Apply a gentle makeup remover or cleansing oil to a cotton pad and start by removing the contour makeup on your cheeks, nose, and forehead. Gently wipe away the product, taking care not to rub too vigorously, especially if you have sensitive skin.
6. Cleansing Oil for Full-Face Contour:
- For full-face contour makeup, use a cleansing oil or a gentle oil-based cleanser to dissolve the makeup. Apply the oil to dry skin and massage it in gently. This will help break down and lift the contour makeup.
7. Rinse with Warm Water:
- After using the cleansing oil, rinse your face with warm water to remove the oil and makeup residue. Pat your face dry with a clean towel.
8. Micellar Water Cleanse:
- To ensure all makeup is removed, follow up with micellar water on a cotton pad. Swipe it over your face to pick up any remaining traces of makeup.
9. Gentle Cleanser:
- Finish the removal process with a gentle, hydrating facial cleanser. Use lukewarm water to cleanse your face thoroughly, removing any residual makeup, oil, or impurities.
10. Pat Dry:
– After cleansing, pat your face dry with a clean towel. Avoid rubbing or pulling on your skin, especially around the eye area.
11. Moisturize:
– Apply a moisturizer suited to your skin type to replenish hydration after makeup removal.
12. Eye Cream (Optional):
– If you use an eye cream, apply it gently around the eye area to hydrate and nourish the delicate skin.
13. Double-Cleansing (Night Routine):
– If you wear heavy or long-lasting makeup regularly, consider incorporating double-cleansing into your nighttime routine. This involves using a makeup remover or cleansing oil first, followed by your regular facial cleanser.
14. Weekly Exfoliation (Optional):
– Once a week, consider exfoliating your skin to remove dead skin cells and keep your complexion radiant. However, avoid over-exfoliating, as it can irritate the skin.
By following these steps and using gentle, effective products, you can remove contour makeup without harming your skin. Proper makeup removal is crucial to maintaining clear and healthy skin, allowing you to start each day with a clean slate and a fresh face.
Customizing Your Contour: Unleash Your Creativity
Get creative with your contouring by experimenting with unconventional shades and styles, exploring the artistic side of customizing your contour.
Contouring isn’t just about following a set of rules; it’s an art form that allows you to express your unique style and creativity. Customizing your contour makeup opens up a world of possibilities, allowing you to experiment with different techniques, shades, and styles to achieve a look that’s entirely your own. Here’s how you can unleash your creativity and customize your contour:
1. Play with Different Shades:
- Contouring doesn’t have to be limited to traditional shades. Experiment with various contour and highlight colors to create unique effects. Try cooler tones for a dramatic, sculpted look or warmer tones for a sun-kissed appearance.
2. Mix and Match Products:
- Combine cream and powder contour products for a multidimensional effect. Start with a cream contour to define your features and set it with a powder contour for extra staying power.
3. Experiment with Textures:
- Explore different textures, such as matte and shimmer, to add depth and dimension to your contour. Matte shades create shadows, while shimmer adds a luminous glow to high points.
4. Contour Beyond the Face:
- Don’t limit contouring to just your face. Experiment with body contouring to enhance muscle definition or create a sculpted look on your collarbones and décolletage.
5. Get Creative with Lines:
- Contouring isn’t just about shading; it’s also about creating lines and shapes. Experiment with contour lines to change the appearance of your facial structure or draw attention to specific areas.
6. Mix Your Highlighters:
- Create custom highlighters by mixing different shades or even adding a touch of glitter. This allows you to tailor your highlight to the occasion or your mood.
7. Ombre Contour:
- Create an ombre effect by blending multiple contour shades from dark to light. This technique can make your contour appear more natural and gradual.
8. Draping Technique:
- Explore the draping technique, which involves using blush shades to contour and sculpt your face. This technique adds a pop of color while defining your features.
9. Graphic Contouring:
- Go bold with graphic contouring by creating intricate designs or patterns on your face. This avant-garde approach allows you to push the boundaries of traditional contouring.
10. Mix with Other Makeup Trends:
– Combine contouring with other makeup trends like color blocking or neon makeup to create unique, eye-catching looks.
11. Stencils and Tapes:
– Use makeup stencils or tapes to create precise contour lines and shapes. This can be especially helpful for intricate contour designs.
12. Practice and Experiment:
– Don’t be afraid to practice and experiment with different techniques and styles. Makeup is an art, and the more you play around with it, the more you’ll discover your unique contouring style.
13. Document Your Looks:
– Take photos of your customized contour looks to track your progress and learn what works best for your face shape and features.
14. Makeup Challenges:
– Participate in makeup challenges or follow makeup artists on social media for inspiration and to learn new techniques.
Remember that makeup is a form of self-expression, and there are no strict rules when it comes to contouring. Customizing your contour allows you to celebrate your individuality and creativity, so embrace the freedom to contour in a way that makes you feel confident and beautiful. Whether you prefer subtle enhancements or bold, avant-garde looks, the world of contouring is yours to explore and enjoy.
Contouring for Special Occasions: Elevating Your Look
How to Contour Makeup
Elevate your makeup game for weddings, parties, and other special events with expert contouring tips, a must-know for special occasion contour makeup.
Special occasions call for an elevated and polished appearance, and contouring can be a game-changer when it comes to achieving a glamorous and stunning look. Whether you’re attending a wedding, a formal gala, or a milestone celebration, contouring for special occasions allows you to enhance your natural beauty and ensure your makeup looks flawless in photographs and under different lighting conditions. Here’s how to elevate your look with contouring for special events:
1. Plan Ahead:
- Start your makeup routine with ample time to spare before the event. Rushing can lead to mistakes. A well-planned makeup session ensures a stress-free experience.
2. Full-Face Contour:
- Consider a full-face contour to sculpt and define your features. This involves contouring your cheeks, jawline, nose, and forehead for a complete transformation.
3. Use High-Quality Products:
- Invest in high-quality contouring products that offer excellent pigmentation and longevity. Quality products can make a significant difference in the final result.
4. Practice:
- If you’re new to contouring or trying a new technique, practice in advance. Familiarity with the process will boost your confidence on the day of the event.
5. Blending is Key:
- Ensure that your contour is seamlessly blended. Harsh lines can be more noticeable in photographs, so take your time blending to perfection.
6. Opt for a Matte Finish:
- Consider using matte contour products for special occasions. Matte finishes tend to look more elegant and less reflective in photographs.
7. Highlight Strategically:
- Use a highlighter sparingly on areas you want to emphasize, such as the tops of your cheekbones, the bridge of your nose, and your cupid’s bow. Avoid overdoing it to prevent an overly shiny appearance.
8. Long-Lasting Formula:
- Choose contour products with long-lasting formulas to ensure your makeup stays intact throughout the event. Setting spray can also help lock in your makeup.
9. Blend with a Light Hand:
- Blend your contour and highlight with a light touch, especially if you plan to be photographed extensively. Heavy makeup can look cakey in pictures.
10. Consider Your Outfit:
– Coordinate your contour with your outfit. Consider the color scheme and style of your attire to create a harmonious and cohesive look.
11. Contour for Different Lighting:
– Think about the lighting conditions at the event venue. Ensure your contour looks flattering in both natural and artificial lighting.
12. Waterproof Products:
– If the event involves tears of joy or potential humidity, use waterproof contour products to avoid makeup mishaps.
13. Blotting Papers:
– Carry blotting papers with you to touch up any shine that may develop during the event.
14. Keep It Timeless:
– While experimenting with makeup is fun, for special occasions, it’s often best to stick with timeless and classic contouring styles that flatter your face shape.
15. Confidence is Key:
– Lastly, remember that confidence is the ultimate accessory. Feel beautiful in your makeup, and your radiance will shine through.
Contouring for special occasions can take your makeup game to the next level, ensuring you look and feel your best. With careful planning, practice, and attention to detail, you can achieve a flawless and glamorous look that’s perfect for making lasting memories on those special days.
The Evolution of Contouring: A Beauty Journey: How to Contour Makeup
Explore the history of contour makeup and its journey from the silver screen to everyday life, gaining insights into the fascinating evolution of contouring.
The art of contouring has undergone a fascinating evolution over the years, transforming from a technique primarily used in the theater and film industry to an everyday makeup staple for people worldwide. This beauty journey explores the captivating history and evolution of contouring:
1. Origins in Theater and Film:
- Contouring’s roots can be traced back to the world of theater and film. Makeup artists in these industries used contouring to define actors’ features under harsh stage lighting and bright studio lights.
2. Max Factor’s Influence:
- Max Factor, a pioneering makeup artist, played a significant role in popularizing contouring. He introduced contouring techniques to Hollywood stars in the early 20th century, creating iconic looks for icons like Marilyn Monroe.
3. Hollywood’s Impact:
- As Hollywood glamorized contouring, it began to influence fashion and beauty trends worldwide. Contouring became synonymous with red-carpet glamour.
4. The 1960s and 1970s:
- In the 1960s, contouring took a backseat as the beauty industry focused on more natural looks. However, the 1970s saw a resurgence of interest in contouring, with makeup artists like Way Bandy emphasizing the sculpted look.
5. 1980s Dramatic Contours:
- The 1980s embraced bold and dramatic contouring, with heavy use of bronzer, blush, and contour products. This era marked the peak of contouring’s popularity.
6. Minimalism in the 1990s:
- The 1990s brought a shift towards minimalism, with many people opting for a more understated makeup look. Contouring took a backseat during this era.
7. Contouring’s Renaissance:
- The early 2000s witnessed a resurgence of interest in contouring, thanks to celebrities like Kim Kardashian and makeup artists sharing their contouring secrets on social media.
8. YouTube and Makeup Tutorials:
- The rise of YouTube and makeup tutorials democratized makeup knowledge. Aspiring makeup artists and beauty enthusiasts learned contouring techniques from online creators.
9. Diverse Contouring Styles:
- Contouring has evolved to accommodate diverse beauty standards and styles. Today, there are contouring methods for every face shape and desired effect, from subtle sculpting to bold transformations.
10. Inclusivity and Representation:
– The beauty industry has increasingly embraced inclusivity and diversity. Contouring products and tutorials cater to a wide range of skin tones and ethnic backgrounds.
11. Contouring Tools and Products:
– Advances in makeup technology have led to a wide variety of contouring tools and products, from cream and powder contour kits to contour sticks and brushes.
12. Empowerment through Makeup:
– Contouring is no longer just about conforming to beauty standards. It has become a form of self-expression and empowerment, allowing individuals to celebrate their unique features.
13. Blending Art and Science:
– Modern contouring techniques blend artistry and science. Makeup artists use contouring to create optical illusions and enhance facial symmetry.
14. Cultural Influence:
– Contouring techniques are influenced by cultural preferences and traditions. For example, K-beauty contouring emphasizes a more youthful, soft look.
15. A Personal Journey:
– Contouring is a personal beauty journey. Individuals adapt techniques to suit their unique style and features, making it a versatile and evolving art form.
The evolution of contouring reflects the ever-changing landscape of beauty and self-expression. From its humble beginnings in the world of entertainment to its current status as a mainstream makeup technique, contouring has undergone a remarkable transformation, leaving an indelible mark on the beauty industry and the way we perceive and enhance our natural beauty.
Insights from Top Makeup Artists: Learn from the Best
Gain valuable insights from renowned makeup artists on their contouring techniques and favorite products, a peek into the world of top makeup artists’ contouring secrets.
When it comes to mastering the art of contour makeup, there’s no better source of wisdom and expertise than top makeup artists who have honed their skills through years of experience. Learning from the best in the industry can provide invaluable insights and techniques that can take your contouring game to the next level. Here are some key insights from top makeup artists:
1. Face Anatomy Mastery:
- Top makeup artists emphasize the importance of understanding facial anatomy. Knowing the structure of the face, including bone structure and muscle movement, is crucial for effective contouring.
2. Personalized Contouring:
- Makeup artists stress the need for personalized contouring. Contouring should be tailored to an individual’s unique face shape, features, and desired look.
3. Subtle vs. Dramatic:
- Different occasions call for different contouring styles. Top makeup artists can seamlessly switch between subtle, natural looks and more dramatic, sculpted appearances.
4. Layering Techniques:
- Layering is a key technique in contouring. Professionals often apply multiple layers of contour and highlight to achieve depth and dimension.
5. Blending Expertise:
- Achieving a seamless blend is the hallmark of a top makeup artist. They stress the importance of blending contour and highlight shades flawlessly for a natural finish.
6. Using the Right Tools:
- Makeup artists know that the choice of brushes and tools is critical. They often have a wide range of brushes and blending sponges to achieve different effects.
7. Strategic Highlighting:
- Highlighting isn’t just about adding shimmer; it’s about strategically emphasizing the high points of the face to create a luminous glow.
8. Contour Placement:
- Professionals have an innate understanding of where to place contour shades to enhance features such as cheekbones, jawlines, and noses.
9. Color Theory:
- Top makeup artists are well-versed in color theory, allowing them to select contour and highlight shades that complement the individual’s skin tone.
10. Adapting to Trends:
– The beauty industry is constantly evolving. Makeup artists stay updated with the latest contouring trends and techniques, ensuring they can create both classic and trendy looks.
11. Time Management:
– Efficiency is key in the world of makeup artistry. Top artists can create stunning contour looks within a reasonable timeframe, making them sought-after for events and shoots.
12. Confidence and Artistry:
– Confidence plays a significant role in makeup application. Top makeup artists are confident in their artistry, which translates into the client’s confidence in the final look.
13. Client Communication:
– Effective communication is vital. Makeup artists consult with clients to understand their preferences and vision, ensuring the contouring aligns with the client’s expectations.
14. Portfolio Building:
– Top makeup artists continuously build their portfolios. They document their work to showcase their skills and attract clients.
15. Adaptability:
– Makeup artists are adaptable. They can create contour looks for various skin types, ages, and ethnicities, showcasing their versatility.
Learning from top makeup artists provides valuable insights into the world of contouring. Their expertise, techniques, and commitment to perfection offer inspiration and guidance for anyone looking to enhance their contouring skills. Whether you’re a professional makeup artist or a beauty enthusiast, gleaning wisdom from the best in the industry can help you achieve stunning and flawless contour makeup looks.
Conclusion
In conclusion, mastering the art of contour makeup is within your reach. With the right tools, techniques, and knowledge, you can achieve a stunning contoured look that enhances your natural beauty. So, go ahead, experiment, and have fun contouring your way to confidence!
FAQs: Your Contour Makeup Questions Answered For How to Contour Makeup
How often should I contour my face?
Contouring can be done daily or reserved for special occasions. It’s entirely up to your personal preference.
Can contour makeup look natural?
Yes, with proper blending and choosing the right shades, you can achieve a natural-looking contour.
What’s the difference between contour and bronzer?
Contour creates shadows to define features, while bronzer adds warmth and a sun-kissed glow.
Should I contour before or after applying foundation?
It’s generally recommended to contour after applying foundation for a seamless finish.
Can I contour if I have oily skin?
Absolutely! Just be sure to use matte products that are suitable for your skin type.
Is contour makeup suitable for beginners?
Yes, beginners can start with simple contouring techniques and gradually advance their skills.
How to Contour Makeup
How to get makeup out of clothes?